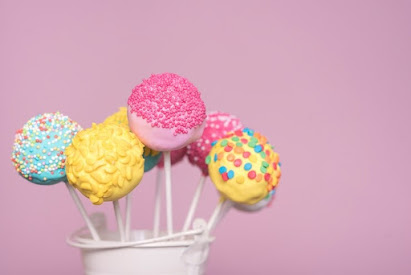
Mastering the Art of Cake Pops: A Comprehensive Guide to Perfectly Delicious Treats
I. Introduction
A. Brief overview of cake pops and their popularity
B. Benefits of making cake pops at home
II. Understanding the Basics of Cake Pops
A. What are cake pops?
B. History and origin of cake pops
C. Why are cake pops so popular?
III. Essential Tools and Ingredients
A. List of necessary tools for making cake pops
B. Overview of key ingredients and their purpose
C. Tips for choosing the right cake flavors and fillings
IV. Preparing the Cake
A. Baking the perfect cake for cake pops
1. Choosing the right cake recipe
2. Tips for achieving a moist cake texture
B. Cooling and crumbling the cake
1. Proper cooling techniques
2. Methods for crumbling the cake evenly
V. Binding and Shaping the Cake Pops
A. Making the cake pop mixture
1. Selecting the right binding agent (frosting, cream cheese, etc.)
2. Balancing the texture and consistency
B. Shaping the cake pops
1. Step-by-step instructions for forming uniform cake balls
2. Tips for preventing cracks and air bubbles
VI. Dipping and Decorating Cake Pops
A. Melting chocolate or candy coating
1. Different methods for melting chocolate
2. Choosing the right chocolate for coating
B. Proper techniques for dipping cake pops
1. Ensuring smooth and even coating
2. Dealing with common dipping challenges
C. Creative decorating ideas for cake pops
1. Sprinkles, colored sugar, and edible glitter
2. Using icing, fondant, or edible markers for intricate designs
VII. Storing and Presenting Cake Pops
A. Storing cake pops to maintain freshness
1. Refrigeration vs. room temperature storage
2. Packaging options for gifting or displaying
B. Tips for presenting cake pops beautifully
1. Display stands, trays, and arrangements
2. Adding decorative touches like ribbons or tags
VIII. Troubleshooting Common Issues
A. Cake pops falling off the sticks
B. Cracking or breaking during the dipping process
C. Difficulty achieving a smooth coating
D. Cake pops losing their shape or becoming lumpy
E. Preventing excessive dripping or pooling of the coating
IX. Frequently Asked Questions (FAQs)
A. How long do cake pops stay fresh?
B. Can I make cake pops without a cake pop maker?
C. Can I use store-bought cake mix for cake pops?
D. How far in advance can I make cake pops?
E. Can I freeze cake pops for later?
X. Conclusion
A. Recap of the key steps for making perfect cake pops
B. Encouragement to experiment with flavors and designs
C. Final thoughts on the joy of creating and sharing cake pops
Title: Mastering the Art of Cake Pops: A Comprehensive Guide to Perfectly Delicious Treats
Introduction
Cake pops are a popular treat that can be made at home or purchased from bakeries. They are made by combining crumbled cake with frosting or other binding agents, shaping the mixture into small balls, and dipping them in melted chocolate or candy coating. Cake pops can be decorated with sprinkles, colored sugar, edible glitter, or other toppings.
There are many benefits to making cake pops at home. They are a fun and easy way to get creative with your baking, and they can be customized to your liking. Cake pops are also a great way to use up leftover cake or cupcakes.
Understanding the Basics of Cake Pops
- What are cake pops? Cake pops are small, bite-sized treats that are made from crumbled cake, frosting, and other ingredients. They are shaped into balls and dipped in melted chocolate or candy coating.
- History and origin of cake pops Cake pops were first created by bakers in New York City in the early 2000s. They quickly became popular, and today they are sold in bakeries and grocery stores all over the world.
- Why are cake pops so popular? Cake pops are popular for a number of reasons. They are easy to make, they are customizable, and they are a fun and festive treat.
Essential Tools and Ingredients
- Essential tools for making cake pops:
- Cake pop maker
- Skewers
- Wax paper
- Mixing bowl
- Spatula
- Measuring cups and spoons
- Chocolate or candy coating
- Sprinkles, colored sugar, edible glitter, or other toppings
- Key ingredients and their purpose:
- Cake: Any type of cake can be used for cake pops, but chocolate cake is a popular choice.
- Frosting or other binding agents: Frosting helps to bind the cake together and gives the cake pops a smooth texture. Other binding agents, such as cream cheese or peanut butter, can also be used.
- Chocolate or candy coating: Chocolate is the most popular coating for cake pops, but candy coating can also be used.
- Sprinkles, colored sugar, edible glitter, or other toppings: These are used to decorate the cake pops.
Preparing the Cake
- Baking the perfect cake for cake pops:
- Choose a cake recipe that you like.
- Bake the cake according to the recipe instructions.
- Allow the cake to cool completely before crumbling it.
- Cooling and crumbling the cake:
- Cut the cake into small pieces and place them in a mixing bowl.
- Use your hands to crumble the cake until it is fine crumbs.
Binding and Shaping the Cake Pops
- Making the cake pop mixture:
- Add frosting or other binding agents to the cake crumbs.
- Mix until the mixture is smooth and holds together when you form it into a ball.
- Shaping the cake pops:
- Roll the cake pop mixture into small balls.
- Insert a skewer into each cake pop ball.
Dipping and Decorating Cake Pops
- Melting chocolate or candy coating:
- Melt the chocolate or candy coating in a double boiler or in the microwave.
- Stir occasionally until the chocolate is melted and smooth.
- Proper techniques for dipping cake pops:
- Dip each cake pop ball in the melted chocolate or candy coating.
- Allow the excess chocolate or candy coating to drip off.
- Place the cake pop on a piece of wax paper to set.
- Creative decorating ideas for cake pops:
- Sprinkles, colored sugar, edible glitter, and other toppings can be used to decorate the cake pops.
- You can also use icing, fondant, or edible markers to create intricate designs on the cake pops.
Storing and Presenting Cake Pops
- Storing cake pops to maintain freshness:
- Cake pops can be stored at room temperature for up to 2 days.
- They can also be stored in the refrigerator for up to 5 days.
- Packaging options for gifting or displaying:
- Cake pops can be packaged in individual cups or boxes.
- They can also be displayed on a cake stand or tray.
- Tips for presenting cake pops beautifully:
- Use different colors and flavors of cake pops to create a visually appealing presentation.
- Add decorative touches, such as ribbons or tags, to make the cake pops look even more festive.
Troubleshooting Common Issues
- Cake pops falling off the sticks: This can happen if the cake pop mixture is too dry or if the skewers are not inserted all the way through the center of the cake ball. To prevent this, make sure that the cake pop mixture is moist and that the skewers are inserted at least 1/2 inch into the cake ball.
- Cracking or breaking during the dipping process: This can happen if the chocolate is too hot or if the cake pops are not dipped quickly enough. To prevent this, make sure that the chocolate is melted and cooled to a warm temperature before dipping the cake pops. Also, dip the cake pops quickly and evenly.
- Difficulty achieving a smooth coating: This can happen if the chocolate is too thick or if the cake pops are not rolled in the coating evenly. To prevent this, make sure that the chocolate is melted and thin enough to coat the cake pops easily. Also, roll the cake pops in the coating evenly.
- Cake pops losing their shape or becoming lumpy: This can happen if the cake pop mixture is too wet or if the cake pops are not chilled before dipping. To prevent this, make sure that the cake pop mixture is thick enough to hold its shape. Also, chill the cake pops for at least 30 minutes before dipping them.
- Preventing excessive dripping or pooling of the coating: This can happen if the chocolate is too hot or if the cake pops are not dipped quickly enough. To prevent this, make sure that the chocolate is melted and cooled to a warm temperature before dipping the cake pops. Also, dip the cake pops quickly and evenly.
Here are some frequently asked questions about cake pops:
- How long do cake pops stay fresh?
- Cake pops can be stored in an airtight container at room temperature for up to 2 days.
- Can I make cake pops without a cake pop maker?
- Yes, you can make cake pops without a cake pop maker. Simply roll the cake balls in your hands until they are smooth and round. Then, insert the skewers and dip the cake pops in chocolate as usual.
- Can I use store-bought cake mix for cake pops?
- Yes, you can use store-bought cake mix for cake pops. Simply follow the instructions on the box to make the cake. Then, let the cake cool completely before crumbling it into a bowl.
- How far in advance can I make cake pops?
- Cake pops can be made up to 2 days in advance. Simply dip the cake pops in chocolate and let them dry completely before storing them in an airtight container.
- Can I freeze cake pops for later?
- Yes, you can freeze cake pops for up to 2 months. Simply freeze the cake pops on a baking sheet lined with parchment paper. Once the cake pops are frozen solid, you can transfer them to an airtight container and store them in the freezer for up to 2 months.
To make perfect cake pops, it is important to follow the key steps:
- Make sure that the cake pop mixture is moist and thick enough to hold its shape.
- Insert the skewers into the cake balls at least 1/2 inch.
- Chill the cake pops for at least 30 minutes before dipping them.
- Melt the chocolate and cool it to a warm temperature.
- Dip the cake pops in the chocolate quickly and evenly.
- Let the cake pops dry completely before decorating them.
Experiment with different flavors and designs to create your own unique cake pops. Have fun and enjoy the process of creating and sharing these delicious treats!


Comments
Post a Comment